
Astrolabe Clock
Astrolabe Clock is an astronomical clock inspired by the astrolabe, an ancient astronomical instrument used to tell time and to predict the location of the Sun, stars
and planets. This modern interpretation gives a view of the sky showing at a glance the time of day, day of year, and the location in the sky of the Sun, Moon, planets and stars. Astrolabe Clock also
gives the time of sunrise and sunset, the phase of the Moon, transit times for the Sun, Moon, planets and stars, and can be used to show the occurrence of solar and lunar eclipses.
Find out how
to read and use the Astrolabe Clock by scrolling past this screenshot:
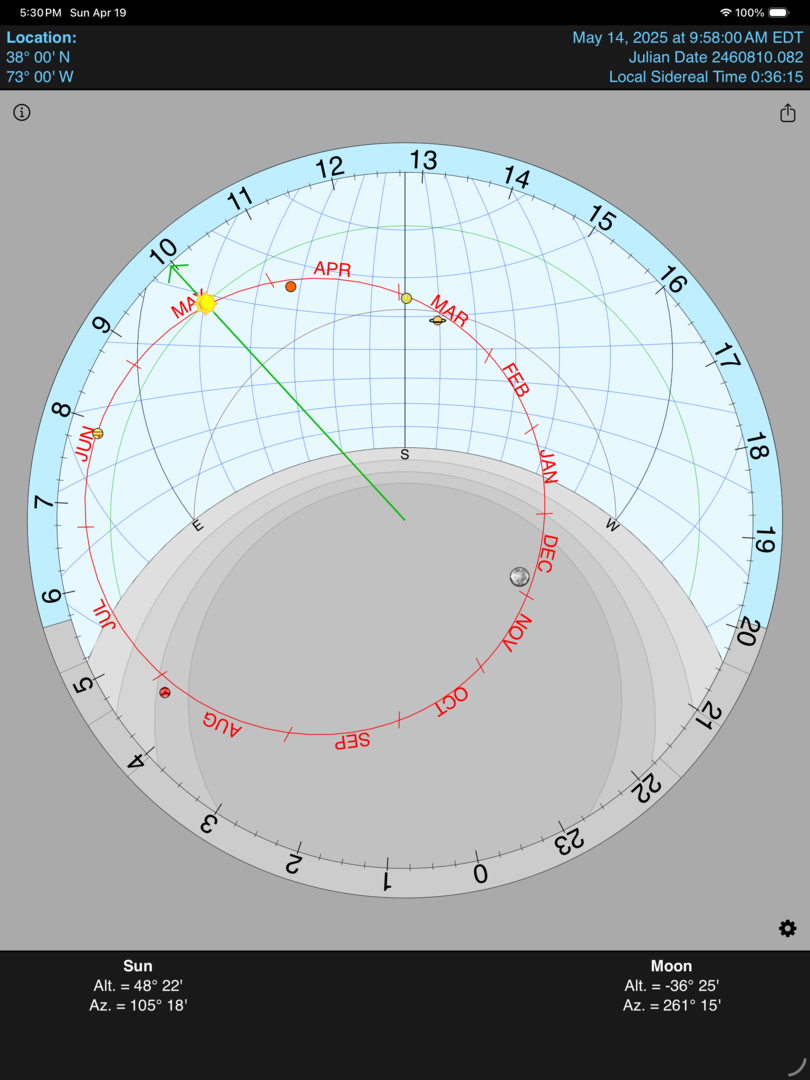
How to read and use the Astrolabe Clock:
- The green arrow points to the time of day given in hours on the outer ring. The above example shows 10:22 AM.
- In the outer ring, daylight hours are shown with a blue background, nighttime hours are shown with a grey background. In the above example, sunrise is at 5:43 AM, sunset is at 20:13 or 8:13 PM.
- If enabled in "Settings" (see below), the limits of Civil, Nautical and Astronomical Twilight are shown by different shades of grey in the ground and by thin lines in the outer ring. In the above example, Civil Twilight ends at 20:43 or 8:43 PM, Nautical Twilight ends at 21:20 or 9:20 PM, and Astronomical Twilight ends at 22:03 or 10:03 PM.
- The red circle shows the ecliptic, the apparent path of the Sun on the sky over the course of a year. The Sun's location on the ecliptic gives the date. The above example shows May 26. If the ecliptic pole is visible, it is shown as a red "+". Zodiac signs can be shown instead of months in the "Settings".
- In the main center part of the circle, the sky is blue while the ground is grey. The grid of lines in the sky shows the altitude (angular distance above the horizon) and azimuth or compass heading of objects.
- The center of the view, given by a vertical black line, is either due South or North depending on the projection selected in "Settings" (see below). Black lines are also drawn to show due East and West, and directions are labeled just below the horizon with "N", "S", "E" and "W".
- Altitudes and azimuths (Alt/Az) are given in degrees and minutes of a degree. There are 60 minutes in one degree. For altitude, zero degrees is the horizon and 90 degrees is zenith (directly overhead). For azimuth, zero degrees is North, 90 degrees is East, 180 degrees is South, and 270 degrees is West. In the above example, the Sun has altitude 52 degrees, 40 minutes, or a little more than halfway up from the horizon to zenith. The Sun has azimuth 105 degrees, 40 minutes, or between East and Southeast.
- Right Ascension and Declination (RA/Dec) are the equivalent of longitude and latitude on the celestial sphere and are given in terms of hours and minutes for RA and in degrees and minutes of a degree for Dec. Choose between Alt/Az and RA/Dec in the "Settings".
- The celestial equator is shown by a red-brown arc. The Sun's path through the sky on a particular day is shown as a green arc while the Sun is above the horizon.
- The positions of the Sun, Moon and planets are shown at all times whether they are visible (in the sky) or not (beneath the ground). In the above example, the Sun and Moon are visible. The planets Mercury, Venus, Mars, Jupiter, Uranus and Neptune are above the horizon but would not be visible to the naked eye during daylight hours. The planets Saturn and Pluto are beneath the horizon. In the nighttime example shown below, only the Moon and Jupiter are visible. The Sun and other planets are below the horizon and not visible.
- When the Moon is full, a circle is drawn exactly opposite the location of the Sun in the sky. This can be used to determine the possibility of a lunar eclipse. If the Moon lines up with the circle an eclipse will occur. Likewise, when the new (completely dark) Moon exactly covers the Sun a solar eclipse will occur.
- Note that the size of the icons for the Sun, Moon (and planets) are much larger than their actual apparent size in the sky. Therefore, partial overlap of the Sun and Moon icons does not mean a partial eclipse. Eclipses (partial and total) only occur when the Sun and Moon icons precisely overlap.
- Stars are shown only when above the horizon. By default, stars are shown only at night, but can be shown at all times (day and night) by changing the "Settings".
- Date, time of day and location can be set by pressing the "Settings" button. See what the sky looks like from a different location, or at a given date and time in the past or future.
- Time of day can also be changed interactively by dragging the time arrow with your finger. Tap the Sun to enter this mode. Please see description of that below.
- The location of the observer in latitude and longitude is given in terms of degrees and minutes of a degree. The date for the given display is also shown. Julian Date is a time system used by astronomers. It is the number of days since noon on January 1, 4713 BC. Local Sidereal Time is another time system used by astronomers, which gives the Right Ascension that is currently on the meridian. It is useful for a quick calculation of the apparent location of celestial objects in the sky.
- Use pinching gestures to zoom and pan the view. Both portrait and landscape views are supported on the iPad, only a portrait view is supported on the iPhone and iPod Touch.
- Tapping on any planet or star draws a yellow box around the selected object and additional information is given in yellow text. In the nighttime example below, the star Betelgeuse (in the constellation Orion) has been selected. The altitude/azimuth (or RA/Dec) and magnitude (brightness) of the selected object is given. Lower magnitude values indicate brighter objects. A magnitude of one or less is very bright. A magnitude between one and three indicates a moderately bright object. A magnitude greater than three is a dim object.
- Tapping on the location information (altitude and azimuth, or RA/Dec) for the Sun, Moon, or selected object will toggle showing the rise and set times for objects. Tap again on the rise/set time to return to location information.
- For the planet Mars, the Mars Year (given as "MY") and season on Mars (areocentric longitude, given as "Ls") are also shown.

Changing the Time of Day interactively:
- Tapping the Sun icon toggles on and off a mode that allows the time of day to be changed interactively by dragging the time arrow with your finger. When this mode is active the time arrow will be orange instead of the usual green.
- You can zoom and pan the display when the time arrow is orange, but you can only move the time arrow when the display is not zoomed in.
- The time arrow will follow your finger as you drag it around the screen. Use this to quickly check the rise, transit and set times of objects, or to see what the sky will look like at different times of day.
- As a shortcut, you can quickly advance the time by exactly one day by tapping the tip of the time arrow. You can go backward exactly one day by tapping the base of the time arrow (at the center of the display).
- Please note that this feature requires a lot of computations and drawing. It works well on the iPad and recent iPhone and iPod Touch, but can be sluggish on older devices.
Settings:
- Sliding the "Disable auto-sleep" switch to ON will keep your iPad, iPhone or iPod Touch from going to sleep so that the Astrolabe Clock will be on all the time and can sit on your desk as a clock. This will also increase battery usage, of course.
- On the iPhone and iPod Touch, when the "Update Display Frequently" is set to OFF the digital clock in the upper-right corner is still updated every second, but the altitude and azimuth of objects and the clock graphical display are updated only every 5 seconds. This will improve the response to pinching and tapping gestures with no noticeable effect on the accuracy of the clock's graphical display. Setting the switch OFF is recommended for older devices. This setting is not included on the iPad, which always updates the entire display multiple times every second.
- Display of the planets Uranus, Neptune and Pluto (all of which are not visible to the unaided eye) and faint stars (magnitude greater than 3.5) can be turned off in the Settings using switches. Turning those switches OFF will make the display a bit less cluttered (especially on the iPhone).
- Sliding the "Show Twilight Levels" switch to ON will graphically display the limits of Civil, Nautical and Astronomical Twilight using different shades of grey in the ground and thin lines in the outer ring. Civil Twilight is when the Sun is between the 0° and 6° below the horizon. During this period there is still enough natural light that artificial light is not needed for most outdoor activities. Nautical Twilight occurs when the Sun is between 6* and 12° below the horizon. During this period the horizon can still be recognized and traces of illumination in the sky in the direction of sunrise or sunset can still be seen. Astronomical Twilight occurs when the Sun is between 12° and 18* below the horizon. During this period it is quite dark, but not yet dark enough for the most sensitive astronomical observations of faint objects.
- Stars can be displayed both day and night by sliding the "Always Show Stars" switch to ON. During the day stars are shown in black.
- Altitude and Azimuth describe the angular distance above the horizon and the compass heading of objects. Right Ascension and Declination describe an object's location in celestial coordinates and are useful for finding objects on star maps. Either representation can be chosen.
- Display of the ecliptic poles (shown as a red "+" when visible) can be turned on or off.
- The red ecliptic path can be divided to show either months of the year, or the corresponding zodiac symbols.
- If the projection direction is set to "South", the view will be centered to the South and the South Celestial Pole will be at the center of the display. This is the default setting and is most natural for Northern Hemisphere users. If the projection direction is set to "North", the view will be centered to the North and the North Celestial Pole will be at the center of the display. This is most natural for Southern Hemisphere users. For users in either hemisphere using both projections will allow the entire visible sky to be seen. For example, Northern Hemisphere users can switch to the "North" projection to see what stars are visible to the North (and not visible in the standard "South" projection), and Southern Hemisphere users can use the "South" projection to see what stars are visible to the South.
- If the "Reverse East and West" option is turned on, then the east and west directions will be reversed. When using the "North" projection, reversing east and west will make the clock run "forward" with time increasing in the clockwise direction. Although constellations will appear reversed, having the clock run clockwise may be preferable to some users, and will also duplicate the appearance of the traditional astrolabe instrument.
Privacy Policy
Astrolabe Clock does not collect, store, or share any personal data. No analytics, advertising SDKs, or third-party tracking services are used. The app functions entirely on-device.
Support
Questions, comments or suggestions?
Please send e-mail to support@twonineeightsoftware.com to contact us.
Or, fill out the form on the "Contact Us" page.